I am always looking for new (and fast) ways to complete my quilts with a personal distinction beyond just a "regular" border. Sewing plain strips to the ends of my pieced quilt top just won't do justice sometimes. Many beautiful antique quilts employ the Dogtooth Border and I finally decided that I must try this treatment. Not liking to work with fabric cut on the bias, I discovered that fabric strips, stabilized by each other, can yield perfectly cut triangles, already sewn together two-by-two. Here's how.
First, determine the finished size of your dogtooth unit. This is based on the outside edge measurement of your quilt top. The number needs to be one that is easily divisible by the finished size of your dogtooth unit. For simplicity's sake, let's say that your quilt top measures 66-1/2" x 66-1/2". I would look for a number such as 2" or 3" as they are both able to divide your quilt top evenly (the extra 1/2" is the needed seam allowance). If your quilt top has an unusual measurement which makes it difficult to divide evenly by any whole number, add extra border strips to bring the measurements up to an easily divisible number.
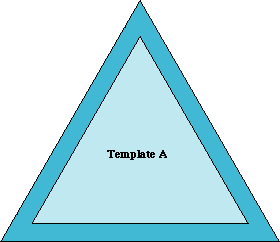
In this case, I want my dogtooth units to finish to 3". That will give me twenty-two units on each side. Use a 60 degree acrylic triangle to cut out your pieces (follow the instructions that came with the ruler) or make a template. I prefer to make a template the size I need (the 60 degree triangle ruler aids me in making my templates). We've included a template for making 3" finished Dogtooth units. The seam allowances are included. Transfer to template material and cut out. Template A has a height of 3-1/2" for Macintosh and 2-1/2" for PC's.
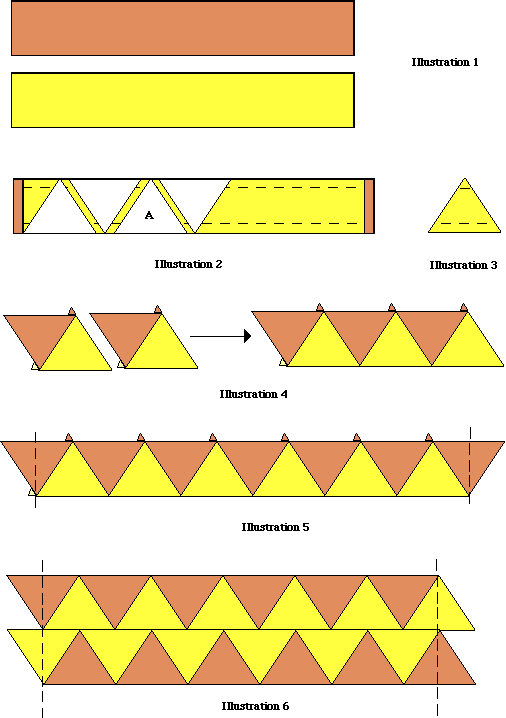
Cut two strips of contrasting colors 3-1/2" x 44" (Illustration 1). Pair together and sew 1/4" along BOTH long edges. Press (Illustration 2). Place triangle template along one long edge and cut out. Flip template over and cut out another. Continue cutting until you've reached the end of the seamed strips (Illustration 2). Pop open the few stitches at the top of each two-triangle pair (Illustration 3). Press triangle pairs open, with seam going toward the darker fabric . Your pairs should look like those in Illustration 4.
Sew triangle pairs together. In this case, I will need twenty-two triangle pairs. I will also need two individual triangles, one to be sewn to each end. These will add the extra width. I will cut off the ends that extend beyond my needed 66-1/2", making sure that I've included the 1/4" seam allowance.
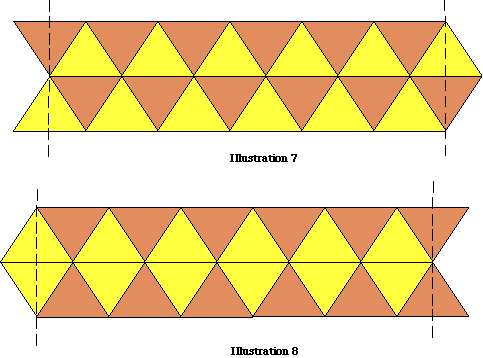
What can you do with these easy Dogtooth units? Borders of varying kinds can be created. Illustration 5 shows one single row. Illustration 6 shows two rows staggered creating a Streak of Lightning treatment. Illustration 7 shows two rows together with alternating light and dark. Illustration 8 shows how you can create the illusion of diamond shapes without having to cut out diamonds!
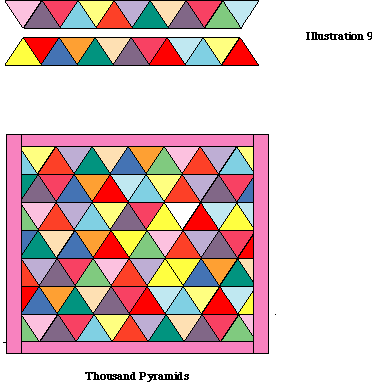
The beauty of making these Dogtooth units in this manner is that it is an easy way of putting together a Thousand Pyramids quilt (see Illustration 9)! Just continue sewing strips, cutting triangles, and sewing sets together until you get a quilt the size you want. Because the two-triangle sets are sewn in horizontal rows, it is easy to lay them out on a design wall for viewing.